
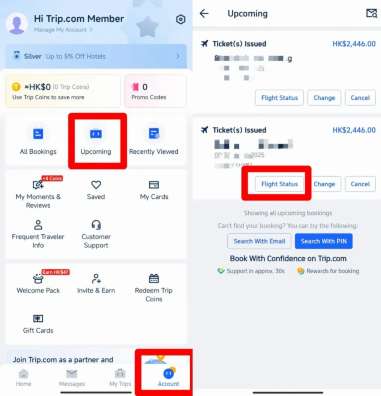
Want to hop on a plane and travel hassle-free? This article walks you through everything you need to know about booking flights with Trip.com, including how to score budget-friendly fares, how to access your e-ticket, and how to change your flight—plus other helpful info you might need.
How to Book a Flight on Trip.com
Step 1: Search for Flights
- First, select Round Trip or One Way, the number of travelers, and your cabin class.
- Next, select your departure city, destination, departure date, and local departure time;
- Finally, search for flights and prices.

Step 2: Enter Passenger Information
- After selecting your flight and fare, enter traveler information on the next page.

Step 3: Select add-on services
- If you'd like, you can choose to purchase value-added services on this page, including Baggage Allowance, Baggage Protection, Insurance, and Flight Perks.

Step 4: Double-check passenger details
- After you’ve entered the passenger information and added any optional value-added services, click 【Next】 at the bottom of the page to proceed to the payment page.

Step 5: Payment
- Choose your payment method, then click Pay to complete your payment.
Step 6: Flight Ticket Issuance
- Once your ticket is issued, we will send a Ticket Confirmation Email to your contact email address.
Important Information
- If you can’t find the flight you’re looking for online, it may be sold out. We recommend exploring other suitable flights or adjusting your travel dates.
How to Book Affordable Flights on Trip.com
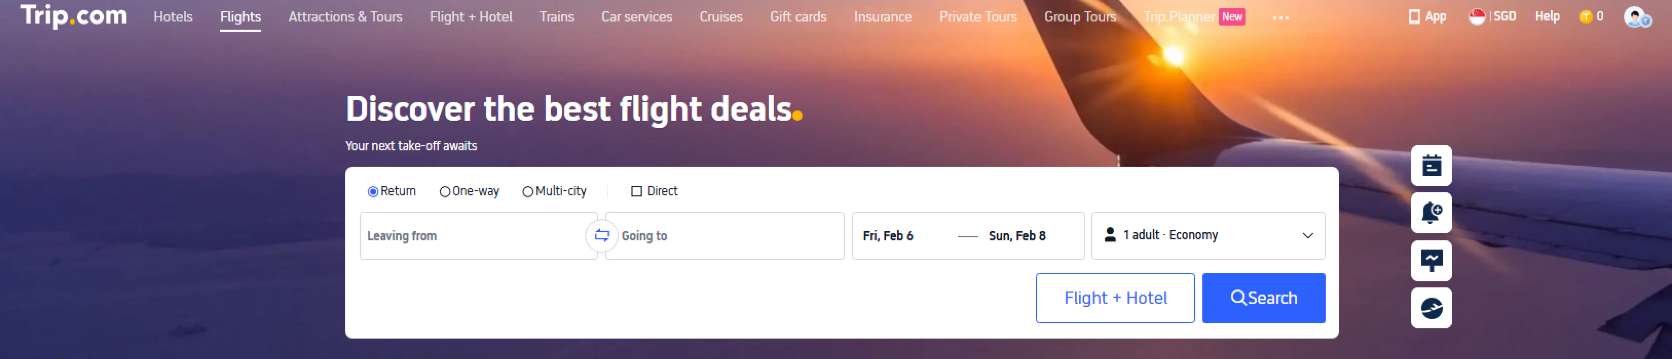
Trip.com offers plenty of smart ways to help you save even more when you book flights. Keep an eye out for our flash airfare deals, subscribe to price alerts to get notified when fares drop, and download the Trip.com App to enjoy even more savings.
Join the Trip.com membership program to unlock exclusive member-only offers. Plus, you can earn Trip Coins and use them on your next booking.
And if anything comes up during your trip, don’t worry—Trip.com’s award-winning 24/7 customer service is always here to help.
✨ Stay in the loop on special deals for public holidays and major festivals
Major airlines often launch limited-time deals and promotions before and after public holidays and major celebrations. If you’re planning a trip, keep an eye out in advance to snag great savings.
✨ Track Flight Prices
With Flight Tracking, you’ll get instant alerts the moment the price on your favorite flight drops. You can fine-tune your alert details anytime so you never miss a deal—stay on top of fare changes and snag the perfect ticket quickly and efficiently.
✨ Subscribe to Trip.com’s promotional emails
Subscribe to Trip.com’s promotional emails to get the latest deals anytime, including offers on flights, hotels, credit cards, and more.
How to Get Your E-ticket on Trip.com
As the name suggests, an electronic ticket is a paperless ticket—the digital version of a traditional paper ticket. The main advantage is that there’s no need to print it, and all the necessary details are securely stored in the airline’s database.
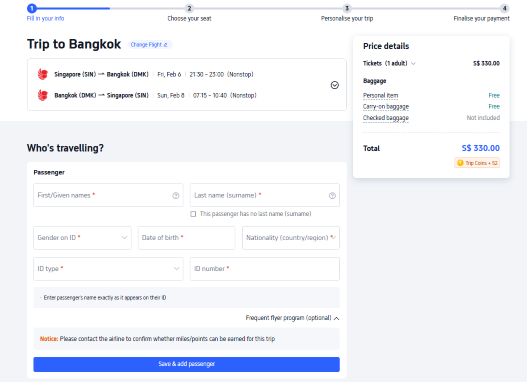
When you book a flight on Trip.com, your Trip.com e-ticket serves as the contract between you and the airline. Your ticket details are securely stored, and you can retrieve your e-ticket using your Passenger Name Record (PNR) or booking reference number.
That way, you can simply use your passport to check in and pass through security, streamlining the boarding process.

Step 1: Sign in to the Trip.com mobile app and go to "All Orders".
- Open the Trip.com mobile app, log in to your account, and tap "All Bookings".
- After selecting your booking, click "Manage My Booking".
- Under the "More Options" section, locate and click the "Get E-Receipt" button.

Step 2: Select e-receipt
- On the receipts page, select the flight e-receipt you want to retrieve.
- Select the relevant electronic receipt, then click "Continue".

Step 3: Enter receipt details
- If you are an individual, please select "Individual".
- Enter your name (optional) and the email address where you'd like to receive your electronic receipt.
- Please note that the type and name on the receipt cannot be changed after submission.
- Click "Send"
Step 4: Confirm and receive your e-receipt
- You'll receive a confirmation message letting you know your e-receipt has been sent successfully.
- Tap “Got it” and check your email to download your e-receipt
- This e-receipt is your Trip.com e-ticket.
How to Print Your E‑Ticket on Trip.com

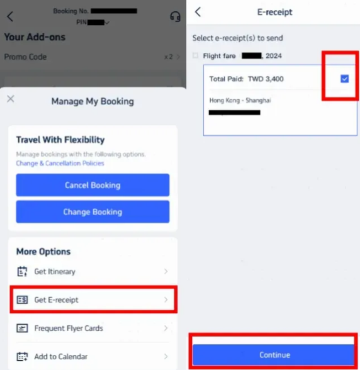
After you book a flight on Trip.com, Trip.com will send you an email with your Trip.com e-ticket attached. You can open the document and print it with a printer.
Please note that while most domestic flights don’t require printed e-tickets, it’s a good idea to keep a digital copy on your device so you can easily access it when needed. If you’re flying internationally, we recommend bringing a printed copy of your e-ticket to show at checkpoints along the way.
Step 1: Download your e-ticket
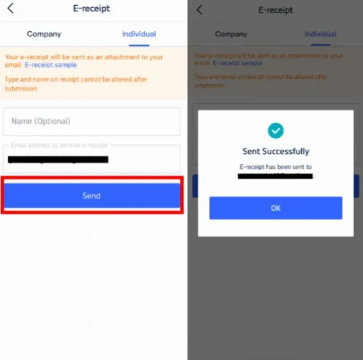
Open your email and download the attached e-ticket file to your device.
Step 2: Print your e-ticket
Open the downloaded file and print it out.
How to Check In Online on Trip.com

Option 1: Check in while booking your flight
- On the Flights homepage, enter your departure city, destination, travel date, and number of travelers. Click Search, then choose your flight.
- Once you’ve filled in the passenger information and contact details on the booking page, click Submit;
- Once you’re on the “Add-ons” page, check whether 【Priority Boarding】 is available, then continue to the next page to complete your payment.
Important Information🚨
- Before you add the check-in service, please take a moment to read the terms carefully;
- Trip.com will automatically check you in 12 hours before your flight and email you your electronic boarding pass.
Option 2: Check in after booking your flight
- Once your ticket is issued, go to the Flight Orders list, find the corresponding order, and open it.
- Click 【Check in and choose seats】 to try checking in.
Option 3: Check in on the airline’s official website
- If you’re unable to complete online check-in on Trip.com, simply visit the airline’s official website within the timeframe they specify and proceed by entering your airline booking reference and the passenger’s name, along with any other required details.
Option 4: Check In at the Airport
- Please print the e-ticket we sent you and keep it with you, just in case. As a general guideline, arrive at the airport 3 hours before international flights and 2 hours before domestic flights. To stay on top of any schedule changes, please reconfirm your check-in time with the airline.
Important Information🚨
- Right now, Trip.com only supports online check-in for select airlines.
- Some airlines offer paid check-in at the airport or online; please refer to your booking for the exact options shown.
- Most airlines (including low-cost carriers) require a booking reference to check in for international flights. You can find it in your booking under the Order Status column, in the "Airline Order Reference Number and E-ticket Number" section.
Trip.com is Your Go-To Travel Companion

Trip.com is always ready to handle any unexpected twists along the way. Our professional customer support team is available 24/7 to deliver the best assistance and solutions. We also provide multilingual support, including Cantonese, English, and Korean.
Leave all your travel questions—not just flight seat selection—to Trip.com! 💪
FAQs: Trip.com Flight Booking Process
How do I book a flight on Trip.com?
Search your route, compare prices, select your flight, enter passenger details, choose add-ons, and complete payment.Can I choose seats and add baggage during booking?
Yes. Most airlines allow seat selection, baggage, and meals during checkout.How will I receive my e-ticket?
After your ticket is issued, you will receive an email with your e-ticket number and itinerary or can be retrieved via Trip.com apps.What payment methods are accepted on Trip.com?
Trip.com supports credit/debit cards, online banking, and selected local payment options.


NO.1


